Content:
- Elwha Bike & Walk Upriver
- 'My First Impressions' - Trail Designs Caldera Ti-Tri 3 Fuel Cook System
- Elwha Walk Upriver (cont.)
- 'My First Impressions' - Sawyer Squeeze Filter
- Elwha Walk Upriver (cont.)
- 'My First Impressions' - DIY Tyvek Rain Gear System
- Elwha Walk Downriver (cont.)
- Elwha Walk Downriver (end)
Solo Elwha Walk
I was in serious need to clear the mind and get some more training on my legs. In my opinion, there is no better training
grounds than the Elwha valley. This would also give me a perfect opportunity to trail test some tools that I would be bringing with me on my big backpacking trip this summer. Training has been going on now for the last eight months, with the main goal of being in the best shape of my life.
The last handful of trips that I've done, really haven't pushed my body to its limits. Being
a trail runner at heart; I deeply love self punishment. Something about that feeling of when you think, 'Can't take another step'. As you fight with mental negativity and flip it around to push through the fatigue. Its a very addictive feeling to some.
The style of trekking I usually prefer is wake up, walk slow all day, set up, eat, sleep and repeat. Traditional camping has its place, but tends not to push me in the same way as a good stretch on the 'Ol' Legs'. This trip would give me that and even plenty of little surprises. Those little things are really what makes the memories last a lifetime.
This has been the fifth trip up the Elwha valley this year already. I do not enjoy the first 9 miles of this trail one bit; however the Upper Elwha will always draw me back. Hope to take my son there someday.
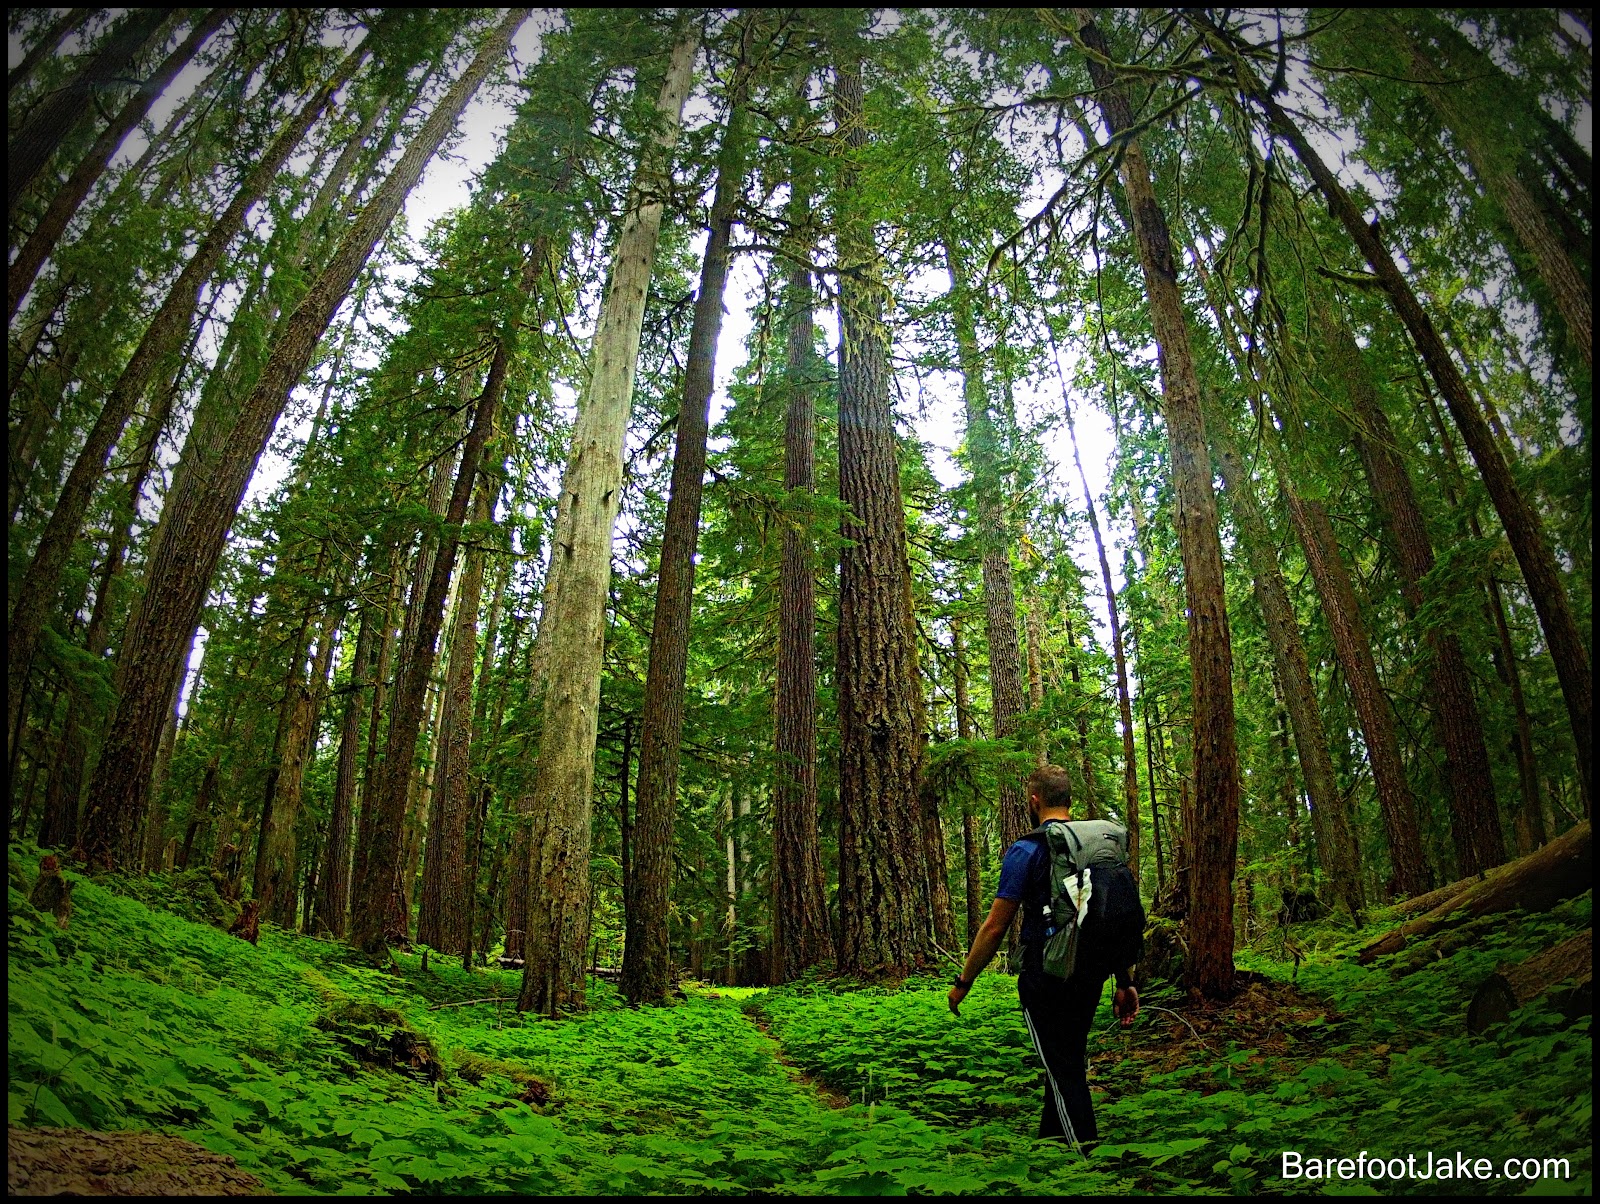
The Upper Elwha is a very spiritual place for me. It is hard to put into words the feels, while you are in this part of the forest. I read that it once was a meeting place for the native american tribes of the peninsula, so that they could do trade.
It is also my belief that every young person should trek the last 15 miles of the valley alone. The forest talks to you and the primal feel it gives you; very much grounds your mind. No ego is big enough to engulf this feeling. Perhaps the native americans once sent their young into this area to become men?
 |
| Upper Elwha Wilderness |
 |
| Starting my day off on the Port Angeles Waterfront for Sunrise (Mt. Baker) |
Walk Upriver
I would jump on a
local public transportation, to begin the journey that has never been done before in its type. After a short bus ride; I had arrive at my drop off point at the Elwha Bridge; where it meets Highway 101. This point has a historic background, since it is where the original Elwha trailhead, once began when settlers came to this area.
 |
| Cycle up the Elwha River during Spring Melt Off (note extra Silt in Water from Dam Removal Project) |
In my opinion there is no better way of enjoying outside, than being outdoors much as possible. That is the main reason why I choose cycling to the trailheads in the Park. However, I feel that peddling is an unnatural movement for the human body, so I try to limit it.
It was a great day for a bike ride. Light breeze in your face with the smell of spring in the air. I rode past a few deer on my journey upriver. After a 12 mile ride, I convinced a rabbit to watch my bike so that no one would steal it.
The lower 12 miles of the Elwha Trail, I have covered in a few other blogs this year, so i will not be sharing that much of the story at this time from that section. Feel free to go back to review those after reading this story.
 |
| A Black Bear Welcome into the Upper Elwha Section - This was 1 of 2 that night |
Testing - Trail Designs Caldera Ti-Tri 3 Fuel Cook System
I was in the need for a lightweight cook system that could run off multiple fuels. When you backpack more remote National Parks, such as the Olympics;
there are not many options to resupply your stove fuel.
It is my opinion that being self reliant is a very valuable skill to have and by saying that I mean coming back into a town to get supplies. So when I started hearing about various stoves that ran off of wood, I was all in on the idea. The main thing I needed to be cautious about is that in the Pacific Northwest it rains almost year around. So how would wood stove do with a fuel that was saturated with water most of the year?
System Fuel Options:
- Denatured Alcohol
- Wood
- Esbit Cubes
I did not use the Esbit option for this trip. This fuel will be harder for me to access when I'm doing my 30+ Days in the Olympic National Park trip and was only testing tools that would be used for this trip only. I however love Esbit and keep one cube in my kit for an emergency fire starter option. This works great; even during heavy rains.
 |
Burning Wood Fuel. Had Dinner going in minutes. Impressed me how well it worked.
|
 |
| Very Fuel efficient and Minimal - Denatured Alcohol 'mode'. A few drops of fuel will Boil water; impressive. |
Tip: Make sure you always use the ground heat shield for any stove you use. It will help the boil efficiency. A flat rock can also be used.
Pros:
- Ultralight
- Compact (all systems fit inside Small Pot)
- Fuel Efficient
- Wood Option (go for weeks without carrying fuel)
Cons:
- Have't found any yet (seriously)
I can clearly see that the Trail Designs guys have been in the game for awhile. The design and products used are seamless. They even include some very handy Tyvek Carrying Sleeves for the parts when storing them internally inside the Pot.
However they need to be more clear on their sticker labeling, because being a dumb hiker. I ripped the storage sleeve thinking it was just for packaging. Not to happy with myself for doing that. Maybe they should put a sticker on top of the box, with a link to their well made Intro Video on the website. 'Do not open until you watch this Video'; for nerds like me.
Will I be bringing this on my Big Adventure?
For sure! This is exactly what I needed for the upcoming trip. A quality and well thought of tool that I could count on.
Disclaimer: This product was given to me for review purposes.
Further Upriver (cont.)
After I slept like a log on a dry night with a warm breeze. I continued upriver at first light. There was a full day of walking to get to my destination ahead of me. Really excited to see what was ahead of me for the day.
 |
| Good Morning - Outside my Shelter |
 |
| Morning Trek through a Mysterious Forest |
 |
| Balancing Act during a River Crossing |
 |
| Restored Camp Wilder Shelter - Wish I could move in |
 |
| White with Spring Melt Off |
Memorable Moment: Met another ultralight backpacker on the trail early in the day. I immediately spotted is older and well broke in Gossamer Gear pack. Judging from the bounce in his step and how early he was trekking. I knew this guy meant business.
We spoke of ultralight gear tips, he informed me that he recently finished the whole PCT thru-hike. Which was a great morning inspiration to me. Exchange of emails was made and a shake of hands, then we were both on our way.
 |
| How I once felt carrying a 75lbs Backpack |
Tested - Sawyer Squeeze Filter
The biggest pain in the butt I find while backpacking, is having to treat water. Originally, I started with a traditional pump and at times wanted to literally throw it off a cliff. This process would mean I would have stop, take off my pack, dig for a water pump, unscrew water storage lid, pump by hand and do all this while trying not to spill everything. This was a process that needed practice to be efficient and really wasn't a smooth process at ALL. This also really didn't fit into my style of hiking; since I like to take minimal breaks and would rather not take my pack off at all through the day.
I have been using water drops, as my foundation treatment.. This will always be a foundation for me; since no moving parts can physically break. So its great to even keep in your 'Emergency Kit'.
Water Drops however, mean that you must still take off your pack and or wait for the mixture to set, before you can keep trekking. So I was still looking for a better option for Fastpacking or Trail Running style of trekking.
When I learned of the option of an inline filter or even better; one with a built on bladder system. My ears perked up like a Deer looking for a predator.
System Options:
- 16oz Pouch
- 35oz Pouch
- 64 oz Pouch
- Inline Filter Option
- Any Bottle Top Option
 |
| 32 oz option folded up for easy water flow |
Tip: Like any bladder; each time you fill with water. Make sure you gently push all air out of storage area. This will make for a better drinking experience and will help with the sloshing noise; as you walk. Another tip is after filling with water. With lid sealed; hang upside down and fold up tight. (like Toothpaste). This will make it easier to get water flow under low levels of water storage in pouch. Do not squeeze the pouch, they will fail.
 |
| Easy and Quick - Fill and keep on Trekking. No time wasted |
I have never been a fan of drinking from water bottle type lids. Something about the mixture of air and water into the mouth. I have always been that ways, since a child. However feel that the benefits out weigh this issue. As the days went on I changed the way the water went into the mouth. I found that with drinking with puckered lips this issue would be decreased.
In this valley it worked out perfectly, since water is so plentiful. I never carried over 10oz of water in my pack. This makes the pack that much lighter; since the heavies thing carried in a backpack is water.
Like any smart trekker. A small amount of drops will always be carried in my kit as a backup. I also don't fully trust any tool with moving or breakable parts. So more time will be needed to gain my trust on longevity.
I also didn't test the inline filter, since it is not a option that will be used on my upcoming big trip. I do plan on using it on my trail runs, that are typically used for training in the winter months.
Thinking myself as a detailed person or some may find it being anal. I immediately found the cap design to be an annoyance that is used during every drink you take. This was on my nerves the whole time. I would like to see a double locking cap that didn't get pushed half way in with every drink. This effected the tools water-flow by at least 1/3 in my experience.
In the past have drank out of thing that have a double locking cap. For the life of me can not remember what that product was, but soon as I remember will be replacing it myself.
Pros:
- Light Weight (3 oz)
- Compact (when empty)
- Fast, Fast, Fast
- Fits in my Gossamer Gear 2012 Gorilla Side Pouch perfectly (without need of bungee for flopping Filter when at 16 oz or less)
Cons:
- It's still a Filter (see above)
- Drinking Cap Design (see above)
- Cleaning (I'm super lazy when it comes to having to do maintenance on things such as filters)
Will I be bringing this on my Big Adventure?
The jury is still out! I need to put it to use some more before that decision is made. I should look at, 'Did I stay more hydrated using this tool?' The answer is definitely YES. Since it was so easy to treat water while one the move; I stayed move hydrated in the long run. Will post up a full review after more use this winter.
Disclaimer: This product was given to me for review purposes.
Even Further Upriver (cont.)
Walking in a valley floor with ground cover; as high as my knee in places, with old growth trees; as high as a city skyscraper and hearing the roar of the river always in the background, is a very primal experience.
 |
| How old you think this Old Growth is? This was a 'Small One'. |
 |
| Group Hug |
 |
| Happy Hollow Shelter |
My Short Video Clip: Elwha River as you enter the Basin during a Rain Storm
Tested - DIY Tyvek Rain Gear System
After working with my resources. I had a suit very kindly donated to me, typically around $15 each. That very day I went to work with my scissors.
I have been using this set up for a few months now, but this is the first time I left everything else home and used this as my only source of rain protection.
During the last rain storm, I was completely damp head to toe. My core temperature was above were I should be. Water easily runs off the Tyvek material. Even while fully saturated; a few shakes and it is dry again with limited moister storage in the fabric.
There is no rain gear on this planet that keeps you 100% dry. No matter what a gear manufacture promises you. So as a human; you need to accept this. Saying that I did not fully seam seal this tool. The most important thing is to keep wind out and keep me warm.
Conditions been in to Date:
- 45 mph+ Winds
- Heavy Rain
- Brush
- Sun Protection
For the cost alone you cant beat it. You can barely get a cup a coffee and a Cookie for $15 these days. Even if the durability is an issue. Just throw some tape on them or replace for minimal cost out of pocket.
 |
| Spring Run off crossing in a Rain Storm |
 |
| Big Tree providing some protection against Heavy Rains. Hood works well for warmth. |
Pros:
- Ultralight (around 7oz)
- Easy to Layer (if you purposely get a large size)
- Cost ($15 on average)
- Style Points (even the Ladies can't resist)
- Stores small in Pack
Cons:
Will I be bringing this on my Big Adventure?
For SURE. I have already been in every condition that I will encounter in the Olympics in the months of August thru September, so I am all in. Will post up a full review after more use this winter.
Disclaimer: I suggest things that work for me based on Climate, Conditions, Type of Trip and Core Temperature Needs.
Downriver (cont.)
I slept like a log once again. Sleeping on the high ground under the old growth tree was a smart move for that night. I stayed bone dry and warm all night.
 |
| Some of the many Roosevelt Elk walked into that morning |
 |
| Elwha River near the source during Spring Melt Off |
 |
| Massive Old Growth Forest |
 |
| Party Time |
 |
| Just Loungin' |
 |
| The Simple Life |
 |
| Trail Miles with my Luna Original Sole Naked Top w/ new ATS Laces |
Further Downriver (cont.)
Memorable Moment: With 9 Miles left of my 12 hour hiking day. I just happen to run into the owner of a Local Donut Shop. After exchanging some stories, she just happened to have some of the sweet deep fried goodness in her backpack. I was so excited to eat them at this point in the day, I forgot to take pictures (which is rare); so I guess some things are better left in the mental image storage bank. So next time you're in this area. Go support that local business.
Another Memorable Moment: Clallam Transit does not run its buses on Sunday (I decline to comment) This meant I must hold up a few miles before the trailhead in order to catch the transit first thing in the morning. So arriving at this hold up location that night, I ran into some locals that were day hiking. They gave me one of there precious beers, with no questions asked. There is still good people in the world.
 |
| I will remember this Beer for the rest of your Life. To the Giver - Thank You Very Much and Cheers |
 |
| I even had precious Kettle Chips to go with the Adult Beverage |
 |
| On the Cycle out. I Biked up on a Family of Deer that all ran off the Road, besides this Baby Deer that 'Played Dead' for me. Good thing I don't drive a Car. (no Baby Deer were harmed in taking this Picture and Mother was close by) |
 |
| Piece of Dam perhaps? |
 |
| Victory Lunch - Yes; I ate the whole thing in about 5 minutes |
This will go into my personal accomplishments list. Since this is the first trip of its kind to ever been done in the Elwha Valley by any man. I feel like a pioneer in the world of minimalist adventures. I could feel the presence of the native american spirits that are lost in this forest. I will never forget this one.
Trip Stats
- Round Trip Cost - $3
- 24 Mile Bike
- 60 Miles of Backpacking
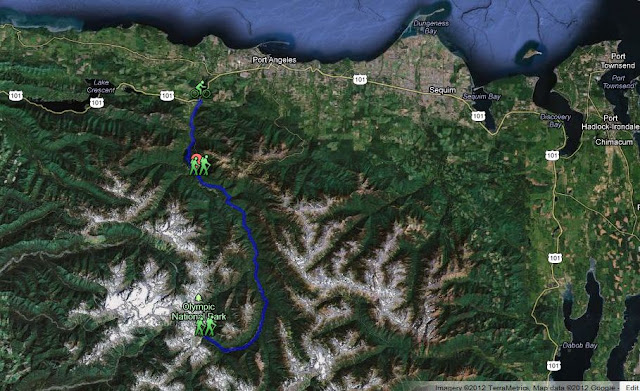 |
| My Route into the Heart of the Olympic National Park |
Updated in 2025 by
Barefoot Jake
Disclaimer/Comments: Biking, Hiking or Backpacking in Minimalist Footwear takes strong feet. Give your body time to adjust to this type of Footwear before attempting anything you see on this Site.